‘Ay up lad’ or ‘Ooh aaar m’dear’?

Watching the first stage of the Tour de France travelling through Yorkshire today reminded me of what I had always thought of as one of the most ‘Yorkshire’ television ads of all time: a young lad pushes his bike up a cobbled hill, on his way to deliver a basket full of Hovis bread loaves, while a brass band plays Dvořák’s New World Symphony (Symphony No. 9)The advert was directed by Ridley Scott in 1973. A few years later he went on to start his movie directing career with The Duellists and then Alien. The advert was voted the nation’s favourite in a poll a few years ago (albeit in a poll of just 1,000 people!).

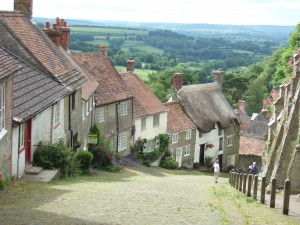
However, my memory has failed me—I had always remembered it as being voiced by a man with a Yorkshire accent. I think the brass band would certainly have added to the general impression of ‘Northern-ness’. On re-watching it the voiceover is by a man with a West Country accent, and so is perfectly fitting for the location: Gold Hill in Shaftesbury, Dorset.

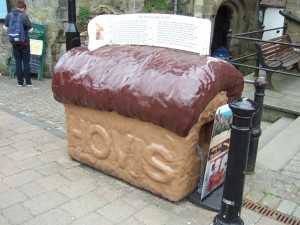
We live in the south-west corner of Wiltshire, so we spend a lot of time in the neighbouring counties of Somerset and Dorset. One of our nearest shopping towns is the Saxon hilltop town of Shaftesbury. 41 years on, Gold Hill is still known as ‘where they filmed that Hovis ad’, and a giant Hovis loaf stands outside the Town Hall, a collecting box for money to go towards the restoration of the Hill. Many of the older buildings in Shaftesbury are built with the green-coloured and well-named greensand stone.

Gold Hill, Shaftesbury. 15 June 2014.

Gold Hill, Shaftesbury, overlooking the Blackmore Vale. 15 June 2014.

The Hovis bread loaf collecting box, outside Shaftesbury Town Hall near the top of Gold Hill.

The Hovis bread loaf collecting box, outside Shaftesbury Town Hall near the top of Gold Hill.

Shaftesbury Town Hall (right) and St Peter's Church (left), on Shaftesbury High Street.

Shaftesbury Town Hall (right) and St Peter’s Church (left), on Shaftesbury High Street.

There were two other Hovis ads using the same music and a Yorkshireman doing the voiceover, which might help to explain my confusion:

and the first one in this sequence, with a boy walking up a cobbled hill (with his Mum):

Hovis do a nice line in ‘nostalgia’ advertising, and in 2008 they made a fantastic and very moving ad, celebrating 122 years of Hovis and British history:

They get an extra ‘yay’ from me for including the fight for Women’s Suffrage and the miner’s strike, as well as the brave men and women of both World Wars.  Four years later Danny Boyle did something similar, but on a far grander scale—but that’s for another blog post!
Tour de France: the Grand Départ

I’m going to be glued to the box for the next 23 days watching the Tour de France. It’s doubly exciting this year—the Grand Départ and first three days are in England, and Team Sky is going for its third consecutive win for Great Britain. I’m very sad that Bradley Wiggins won’t be competing, but watching Geraint Thomas and Richie Porte and the other Team Sky members supporting defending champion Chris Froome’s bid for the title is going to be gripping, as well as Mark Cavendish riding for Omega Pharma-Quick Step.

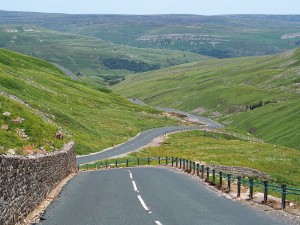
The wonderfully-named Buttertubs Pass, which the Tour will climb later on today.

The wonderfully-named Buttertubs Pass, which the Tour will climb later on today.

The first two days are through the beautiful Yorkshire countryside. The fantastic ITV coverage of the Tour provides great aerial views of the scenery: armchair travelling through gorgeous sunny lands.

Fingers crossed for the Manx Missile winning the stage and the first yellow jersey today.

Mmmm, comfy: Part 2

Here’s Ballou. I know it looks like she’s being tortured, but she’s zenning out while she’s having her ears scratched. This photo was taken about 9 years ago, and she hasn’t sat like this since. Strange creature. I love the way she looks like she’s kicking back in an easy chair—beer and takeaway just out of shot to the right.

Ballou. Not being tortured, honest.

Ballou. She was enjoying this, honest.

Arts and Crafts pewter

Pewter is a silvery metal alloy, a favourite metal of Arts and Crafts metalworkers and jewellers. I have learned from Wikipedia that it is ‘traditionally 85—99% tin, with the remainder consisting of copper, antimony, bismuth and sometimes, less commonly today, lead. Silver is also sometimes used.’ It tarnishes to a dullish grey, and this patinated appearance is often favoured by collectors. If desired, it can be polished to a high silvery shine.

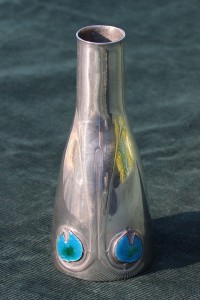
Archibald Knox (designer): Tudric pewter vase with enamelled medallions, for Liberty & Co. Photo by charlesjsharp.

Archibald Knox (designer): Arts and Crafts ‘Tudric’ pewter vase with enamelled medallions, for Liberty & Co. Photo by charlesjsharp.

I have a few pewter objects in my Etsy shop at the moment: three date from the Arts and Crafts period, ie roughly from the 1890s into the early 1900s. and one is very modern, made in the Orkney Islands in the far north of Scotland, but based on a design similar to those of Charles Rennie Mackintosh, one of the most famous Arts and Crafts architects and artists. Originating in the UK, the Arts and Crafts movement put great stead on traditional workmanship, on authenticity and on hand-crafted wares, and on affordable materials—all of which pewter suited perfectly, having been the main metal used for household wares for everyday people for centuries in the UK.

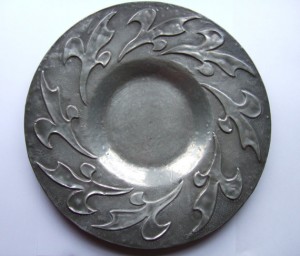
The first piece I listed in my Etsy shop was a shallow Arts and Crafts pewter dish with a flowing fleur-de-lys design. The upper part of the dish is in pewter and it is formed over a white metal base. It would look great as a table centrepiece filled with nuts or tangerines or big bunches of purple grapes—whatever you fancy, really.

il_570xN.535347623_d8sr

Shallow Arts and Crafts pewter dish with fleur-de-lys decoration. For sale in my Etsy shop. (NOW SOLD).

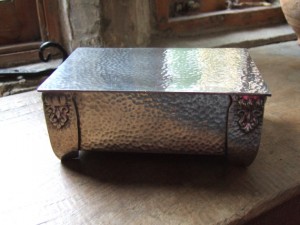
The second is also an Arts and Crafts piece – it originally would have been a cigarette box but would serve as a lovely jewellery or trinket box today. The pewter has the hand-hammered finish that is so typical of Arts and Crafts work. It has been polished by a previous owner so has more of a silvery shine than the other pewter pieces I have.

Arts adn Crafts hammered pewter jewellery box / cigarette box / trinket box. For sale at my Etsy shop.

Arts and Crafts hand-hammered pewter jewellery box / cigarette box / trinket box. For sale at my Etsy shop. (NOW SOLD).

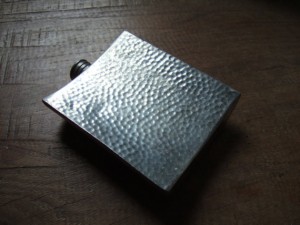
The third piece is also a hand-hammered item – a hip flask cunningly shaped to fit the curve of your buttock as it is carried in a back pocket. (I always think it was a bit of that insane Victorian prudery that caused it to be called a hip flask, when a bottom flask would have been a much more appropriate name!) It is marked ‘English pewter’, and originally carried 4 oz of whatever liquid you wanted to fill it with. The piece has had a life, as witnessed by the dints in the soft metal, but I think this is part of its charm. I love a piece that can tell a tale.

Hand-hammered English pewter hip flask, Arts and Crafts period.

Hand-hammered English pewter hip flask, Arts and Crafts period. For sale in my Etsy shop. (NOW SOLD).

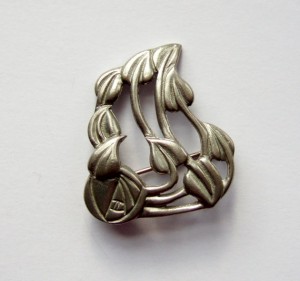
The last pewter piece I have is a modern brooch, in the Arts and Crafts style of famed architect and artist Charles Rennie Mackintosh. It is made by the Ortak company, based in the Orkney Islands off the far north coast of Scotland.

Ortak pewter brooch, in the style of Charles Rennie Mackintosh, and featuring a Glasgow Rose.

Ortak pewter brooch, in the style of Charles Rennie Mackintosh, and featuring a Glasgow Rose. For sale in my Etsy shop. (NOW SOLD).

It features the famous Glasgow Rose, a stylised rose flower made famous by the artists of the Glasgow School of Art, where Mackintosh trained. After going into administration last year, the Ortak company has been bought by new owners and will be relaunched, with manufacturing resuming in Orkney.

Pillinger Point

Pillinger Point, overlooking Endeavour Crater, Mars.

Pillinger Point, overlooking Endeavour Crater, Mars.

I look at various NASA websites regularly, and one set of missions on which I’m particularly keen are those currently operating on Mars. Of the two indomitable Mars Exploration Rovers, launched in June and July 2003, and both landed in January 2004, and only supposed to have a mission life of 90 sols (a sol is a Martian day, just a tad longer than ours at 24 hours and 39 minutes), Opportunity is still going. And then of course there’s the amazing Curiosity rover, launched in November 2011 and landed on Mars in August 2012. I got up very early to watch the landing live on the NASA webstream, and it was so exciting, learning that it had landed successfully after the complex landing procedure that involved the never-before used sky crane. My heart was in my mouth for a goodly while—but I bet that was nothing compared to what the project scientists were experiencing. I have also taken part in the citizen science project to classify (tag) images sent back to earth by Opportunity and its now sadly non-operational partner, Spirit.

I think part of the reason I am fascinated by Mars is that it is a desert planet, and I love deserts. Many of the photos in the Tag Mars citizen science project show a beautiful, desolate landscape, though occasionally you can see a dust devil caught as it passed by, or see the ripples of sand cut through by the rovers’ tracks. They could easily be the deserts in which I have worked in the Middle East. So familiar, and yet so other-worldly.

I checked recently on the progress of Curiosity and saw on 24 June it had taken a photo from a spot named Pillinger Point, overlooking Endeavour Crater. The brief text mentioned it was named after Professor Colin Pillinger, who died in May this year.

Professor Colin Pillinger.

Professor Colin Pillinger (9 May 1943—7 May 2014).

Colin Pillinger was a British planetary scientist and one of the driving forces behind the Beagle 2 mission to Mars. Sadly that mission was not a success. Like Spirit, it too was launched in June 2003, but although it was deployed from the ‘mother ship’ for landing on Christmas Day 2003, communication was lost, and with it, the mission. I remember seeing footage of Professor Pillinger announcing that Beagle 2 was lost, and how absolutely destroyed he seemed. All those years of hard work, all that hope, all that potential for science, lost in a few moments.

Today there is a lovely piece on the BBC website about this photo and the naming of a topographic feature on Mars after Prof. Pillinger. It is written by Steve Squyres of NASA, who worked on the Spirit and Opportunity rovers and became a good friend of Prof. Pillinger’s. It’s a very touching tribute.

(Ahoy there mateys: I love too that Beagle 2 was named after the vessel, HMS Beagle, on which Charles Darwin conducted his historic and world-changing research; Endeavour Crater is named after the bark, HMS Endeavour, on which Captain Cook undertook his voyage of discovery to the southern hemisphere.)

Focaccia with rosemary and sea salt

I’m on a bit of a bread making spree, mainly because Chap bought some live yeast for me the other day for the Sturminster Newton Mill flour and I need to use it all up as it has a limited fridge life.

I decided to make some focaccia, using a BBC recipe by Lesley Waters, the first one I came to on a google search. This recipe makes two large focaccias.

Ingredients
30 g/1 oz fresh yeast
½ tsp sugar
600 ml/1 pint 2 fl oz warm water
4 tbsp olive oil, plus extra for oiling
680 g/1½ lb strong white flour, plus extra for dusting
2 tsp salt
2 tbsp olive oil
1½ tsp coarse salt
leaves from 3-4 rosemary sprigs

Preparation method
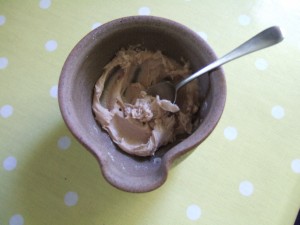
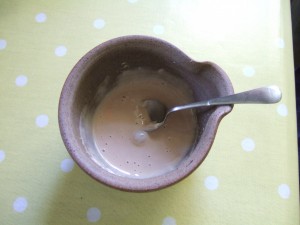
Mix the yeast with the sugar in a small bowl for about 30 seconds, until the yeast becomes liquid.

Live yeast and sugar when I've just started to mix them.

Live yeast and sugar when I’ve just started to mix them.

b1

Thirty seconds of stirring and it magically becomes liquid!

Stir in two-thirds of the water and the olive oil.
In a large bowl stir together the flour and the salt. Pour the yeast mixture into the flour and salt along with some of the remaining water, if needed. Mix with a wooden spoon and bring together to form a soft dough.

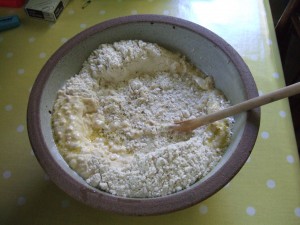
Flour, salt, oil, yeast and water mix.

Flour, salt, oil, yeast and water mix.

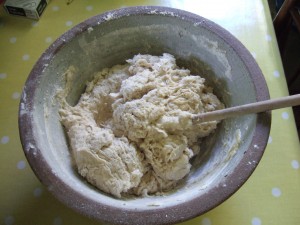
Ready to turn out and knead.

Ready to turn out and knead.

Add more water if the dough is a bit dry. (I found I didn’t need to add any extra – the original 400 ml is plenty).

Turn the dough out onto a lightly floured surface and knead for ten minutes until smooth and elastic.

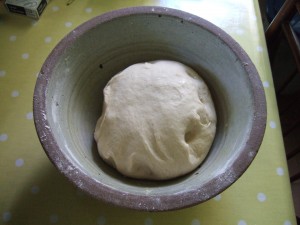
After kneading, ready for proving.

After kneading, ready for proving.

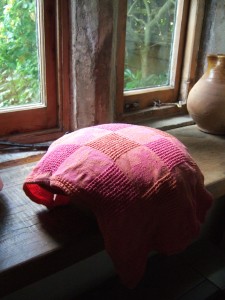
Place the dough into a large, lightly oiled bowl. Cover with cling film or a damp cloth and leave in a warm place to prove (rise) for about 1½ hours until doubled in size.

After 1 hours of proving over our storage heater.

After proving.

Preheat the oven to 220C/400F/Gas 7.
When the dough has risen, knead it again for about five minutes on a clean floured work surface to ‘knock it back’.
Shape the dough into two rough circles (I did rounded rectangular shapes because that’s what fitted my baking sheets). Place the circles (shaped dough) onto two baking sheets, cover with a clean, damp cloth and allow to prove (rise) until double their original size (about 10-15 minutes).

When the dough has risen, use your fingertips to form dimples in the dough. Brush with the olive oil and sprinkle with the salt and rosemary leaves. (I used dried ones I collected and chopped last year; fresh are even better!)

Transfer the baking sheets to the oven and bake for ten minutes.
Reduce the heat to 190C/375F/Gas 5 and bake for a further 15-20 minutes until the loaves are golden and cooked through. If you like, you can spray the bread with water (using a mister) once or twice during baking so that it ‘steams’ in the oven.
When baked, turn out onto a wire rack to cool slightly. The focaccia is best eaten on the day it is made.

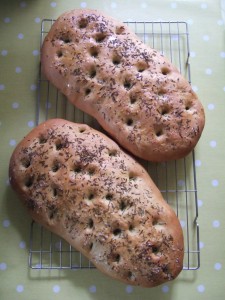
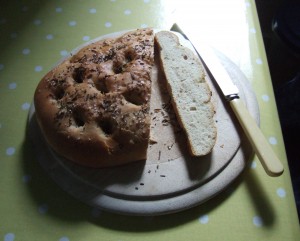
Ready to eat, with dried rosemary sprigs and sea salt.

Cooling and ready to eat, with dried rosemary sprigs and sea salt.

In the version above I have reduced the cooking time given in the original recipe as my focaccia were done after 30 mins total cooking, and I didn’t bother with the misting. They freeze really well.

Yum!

Yum!

Linda’s chickens

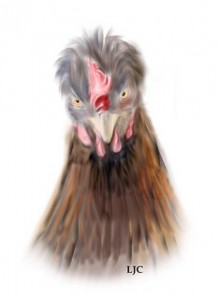
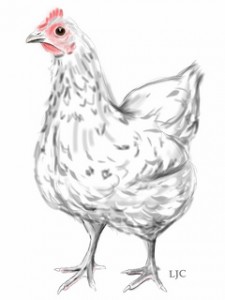
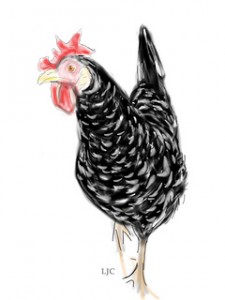
Our friend Linda is not only a very generous chicken-egg-giver, but also a very talented chicken artist (is that a thing? Well, it is now): she has a Flickr album of the terrific drawings she has done of her chucks using her iPad.

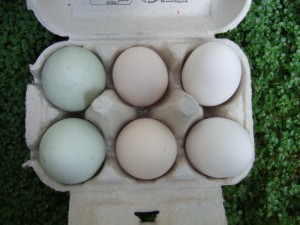
So now I can match the eggs to the chicken:

Linda's eggs: left to right blue ones

Eggs from Linda’s chickens: left to right blue ones = Cotswold Legbar, little cream ones = Australorp; big white pointy ones = Ancona.

Cotswold Legbar by Linda Coleman.

Cotswold Legbar by Linda Coleman.

Australorp chicken by Linda Coleman.

Australorp chicken by Linda Coleman.

Ancona chicken by Linda Coleman.

Ancona chicken by Linda Coleman.

Favourite websites: APOD

After a couple of gloomy posts about the poor hedgehogs, I thought I should feature something wonderful and lovely and spirits-raising. And so … here’s a mention of one of my favourite websites to brighten things up: NASA’s APOD site, otherwise known as the Astronomy Picture of the Day.

It pretty much does what it says on the tin: every day it features a wonderful photo to do with the skies above us. Sometimes they are Hubble space telescope shots, sometimes they are photos by the legion of talented amateur photographers who photograph our skies by both day and night, sometimes they are photos taken from the International Space Station; whatever the source they are invariably beautiful shots that fill me with wonder and joy.

M16: Pillars of Creation. Pillars of evaporating gaseous globules emerging from pillars of molecular hydrogen gas and dust in the Eagle Nebula, which is associated with the open star cluster M16. Photo by J. Hester and P. Scowen.

M16: Pillars of Creation. Pillars of evaporating gaseous globules emerging from pillars of molecular hydrogen gas and dust in the Eagle Nebula, which is associated with the open star cluster M16. Photo by J Hester and P Scowen.

I am completely unscientifically-minded, but I love learning about the natural world about us, whether it is the worlds beyond our planet, or the geology and meteorology of our own. NASA has some fantastic websites, and this is one of my favourites. Click on the links in the text written by professional astronomers that accompanies the photos, and have a truffle round in the archive (link at the bottom of the APOD page)—you’ll lose hours but you’ll learn so much!

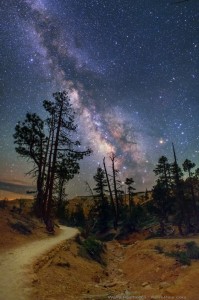
The Milky Way, photographed at Bryce Canyon, Utah, USA. Photo by Wally Pacholka.

The Milky Way, photographed at Bryce Canyon, Utah, USA. Photo by Wally Pacholka.

Sun with solar flare. 13 April 2013. Photo by NASA Solar Dynamics Observatory.

Sun with solar flare. 13 April 2013. Photo by NASA Solar Dynamics Observatory.

Crossing Dingo Gap on Mars, taken by the indefatigable Curiosity Rover near Mt Sharp on Mars.

Crossing Dingo Gap on Mars, taken by the wonderful Curiosity Rover near Mt Sharp on Mars.

Hedgehogs and badgers, part 2

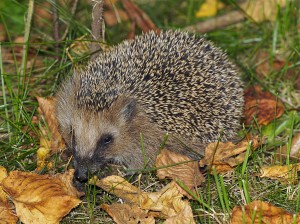
Hedgehog (Erinaceus europaeus). Photo by Jörg Hempel.

Hedgehog (Erinaceus europaeus). Photo by Jörg Hempel.

This morning I was woken at 1.15 am by hedgehog cries, horribly familiar as two nights ago two hedgehogs were attacked by a badger up our lane. This time the badger was attacking a hedgehog in a neighbour’s garden. I was able to get right up to the badger before it ran off through the hedge into another garden. I rolled the poor hedgehog onto a shallow dish (plant pot saucer) and took it into our garden. As I was watching it, more hedgehog cries came from the garden into which the badger had ran. I climbed over the fence (not very dignified), and rescued another hedgehog from the badger and brought it into our garden and put it by the first one. I went back to bed cursing the badger. I think it’s a young one, from the size of it, and am pretty sure it’s attacking the hedgehogs because the ground is so dry and it can’t get at any worms. Chap slept through all the racket, amazingly.

Sad news this morning. Chap found one of the hedgehogs dead on the lawn. As hedgehogs are in serious decline, this is doubly sad. At least the weather forecast is for rain this evening and overnight, so I hope the badger will be able to get at some worms and leave the hedgehogs alone.

RSPCA website link.

Wiltshire Wildlife Hospital website link.

Hedgehog (and other wild animals) rescue charity website link: St Tiggywinkles.

Wholemeal bread

I wanted to use the lovely wholemeal flour we bought the other week from Sturminster Newton Mill, and found a recipe online for Dutch wholemeal bread which seemed straightforward and hopefully foolproof. I haven’t had much success with bread making (we’re talking bricks, not airy doughy delights) and so approached with trepidation. I have doubled the amounts to make two loaves.

Ingredients (makes 2 loaves):

1 kg wholemeal flour
20 g salt
600 ml cold water
40 g tbsp live yeast
additional 200 ml water
olive oil

Preparation:

Measure out the flour and salt and mix into a pile on a clean flat work surface. Using your hands, make a well in the middle, making sure that all sides of this ‘dike’ of flour and salt is of an even thickness, so that the dam won’t break when you add the water. The well should measure about 8 inches across (about 20 cm), which is roughly the length between the tip of your thumb and the tip of your pinky finger when your hands are stretched out and your fingers are spread as wide as they can go.

Dissolve the fresh yeast in the water, by rubbing the yeast between your thumb and your forefinger until it’s completely dissolved. Add the water to the well. Just add a bit at first to see if the dike holds, and if it does, add the rest. Using the tips of your fingers start amalgamating the inner edges of the flour with the water and upping your tempo keep mixing until it starts forming a thoroughly mixed dough.

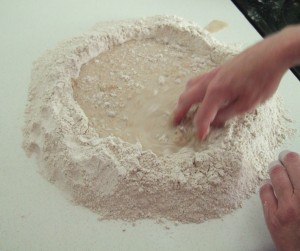
The well in the flour with the yeast and water mix added.

The well in the flour with the yeast and water mix added.  Mud pie time!

Now start kneading the dough, pushing it away from you with the ball of your hand and using your fingers to bring it back towards you. Try to keep a good tempo here and knead for 15 minutes (you can also use a mixer with a dough hook attachment). Add up to 200 ml of additional water, making sure the dough is wet but not sloppy. After 15 minutes of kneading, the dough should feel wet and supple (spongy), but not sticky. If you stretch the dough into a ball you shouldn’t be able to see cracks on the surface and you should be able to stretch it (this means that the gluten has been activated).

Form a ball with the dough and wrap it in a (clean) warm, damp tea towel. Allow to rise for 30—45 minutes at room temperature. The dough will increase by about ⅓ in volume. Remove the tea towel, pummel the dough with your fists and then form it back into a ball, wrap in the tea towel and again allow to rise for 30—45 minutes.

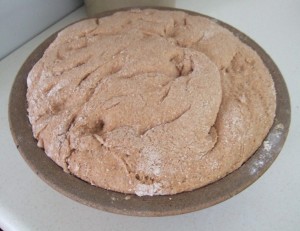
After the second proving. Looks like elephant skin!

After the second proving. Looks like elephant skin!

Grease a bread tin with olive oil. Wet the work surface with some water. Remove the tea towel from the dough and press the dough flat onto the wet work surface. Form the dough into a sausage shape with your hands, so that it is roughly the same length as the bread tin and place into the bread tin. Cover the bread tin with the warm moist tea towel and allow the bread to rise for another 30 minutes until it has increased by ⅓ in volume.

Meanwhile, preheat the oven to 220º C. Reduce temperature to 200º C and place the bread in the oven. Bake for 35—40 minutes. Remove the bread from the tin. If you knock on the baked bread it should sound hollow. If it doesn’t, return to the oven and bake a little longer. Allow to cool on a wire cooling rack.

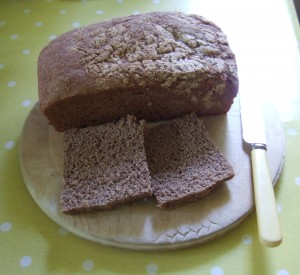
The finished bread. I had to cut the crust off the second loaf  (slices shown) as the nonstick finish in the loaf tin had stuck to the crust. Grrr! (Bad tin is now in the recycling bin).

The finished bread. I had to cut the crust off the second loaf (slices shown) as the supposedly nonstick finish in the loaf tin had stuck to the crust. Grrr! (Bad tin is now in the recycling bin).

The bread is absolutely delicious, largely due to the wonderful flour used. The Sturminster Newton Mill flour has a deep, nutty flavour. The recipe needs nothing added—neither sugar nor other flavourings. It is just perfect as it is.

Recipe via Karin Engelbrecht by kind permission of Fred Tiggelman, the owner of Hartog’s bakery in Amsterdam.